Friday, December 4, 2009

Fried Rice

Fried Rice

I think I need to rename this blog, at least on the claim that these recipes are quick. When I made fried rice this morning, I used three pots/pans total: one to cook the rice, one to cook the eggs followed by the vegetables, and one in which to mix everything. I suppose I'm a chef at heart and this is a dish where cutting certain corners makes a big difference in taste and texture; in other words, some corners are not worth cutting.

This is one of those dishes that I took many attempts to perfect. By perfect, I mean get it so it's not too watery or too dry, but tasty.

Ingredients:
  • 4 cups of rice (measured b/f cooking)
  • 1 small package of frozen mixed vegetables.
  • handful of frozen shiitake mushrooms.
  • a few cloves of garlic.
  • half a cup of chicken broth (ish).
  • 6-8 eggs.
  • soy sauce.
  • sea salt.
Servings: rough guess - 8 servings.

Directions:

1. Cook the rice. I used a rice cooker to do this. I hate having to constantly check the rice when cooking the rice by stove. I'm a rice snob and love medium grain rice (that is not minute rice). So, one corner to cut and avoid washing a pot is to use some sort of instant or quick cooking rice. I cannot give any personal testimony as to how that would affect the taste or quality of the dish, but I would venture to guess, as a cook at heart, it wouldn't taste as good.


Once the rice was ready, I dumped it into a larger container (as seen above) where all ingredients would eventually go.

2. Saute the rice with soy sauce. This does NOT mean to drown the rice in soy sauce. I cannot say how much I put in, but it wasn't all that much. The soy sauce isn't the only condiment that makes the dish salty.


3. I put garlic and olive oil on medium heat. Once I could smell the garlic, I dumped in the eggs and scrambled. I drizzled sea salt on it while it was cooking.

Once it's done, combine it with the rice and gently stir.


Hey, how did this picture get in here? While I was cooking snack time hit, and Victoria let me know this in no uncertain terms. She had to had some, even though I wasn't done.


4. Then I repeated part of 3., put in more fresh garlic with more olive oil. Once I could smell the garlic cooking, I put in the frozen mixed vegetables and shiitake mushrooms. I added in a bit of chicken broth and sea salt.

Once the vegetables were defrosted and hot, it's ready to add to the rest of the stuff.

Stir gently and the dish is ready to serve and eat.

I do not recommend recooking the rice, just to get it hot. If one works fast enough, the rice won't cool off all that much. The various risks of recooking the rice might be as follows: it sticks to the pan, it might become too watery (adding water or broth in attempt to prevent it from sticking), or it might be too greasy (another attempt to prevent it from sticking to the pot or pan).

Also, I often make this with chicken breast or shrimp. I just didn't do it this time, for the girls' sake; they're a bit picky these days, for different reasons.

Friday, November 27, 2009

Thanksgiving free range turkey, with brine

2009-11-27

I was really nervous about making any semblance of a complete Thanksgiving meal, since I've never done it before. On Thanksgiving Day, yesterday, I actually cooked nothing; Sally, Manda, Johnny, Ashley, and Mike blessed us with a wonderfully delicious meal. But the next day, today, I had been planning on having my international student friendship partner over and a fellow Denver Seminary student over for a meal. This would be the international student/friend's first traditional Thanksgiving meal and my first Thanksgiving meal preparation, so I was quite nervous.

My mother-in-law and numerous other friends had suggested the Reynolds Oven Bag as an easy and sure way to cook turkey. I had even purchased some bags early in the week. However, once I had them in hand, I chickened out on using them. I don't know whether it was the idea of throwing them in a plastic bag or the chef part of me coming out. Anyhoo, I asked around to see by what other methods people favor cooking turkeys, and one particular approach was of interest to me, albeit far from the simplest. It involved soaking the turkey in salt water for about a day, which I later learned is a process called brining.

Thankfully, my husband was of tremendous assistance, and he humored me by doing it as I suggested (even though I was flying by the seat of my pants). I had purchased a fresh, free range turkey that had been flash frozen (whatever that means). Having a turkey that was not confined to a cage was very important to me, even if it meant paying a bit extra. Our turkey was somewhere in the neighborhood of 10-12 lbs.

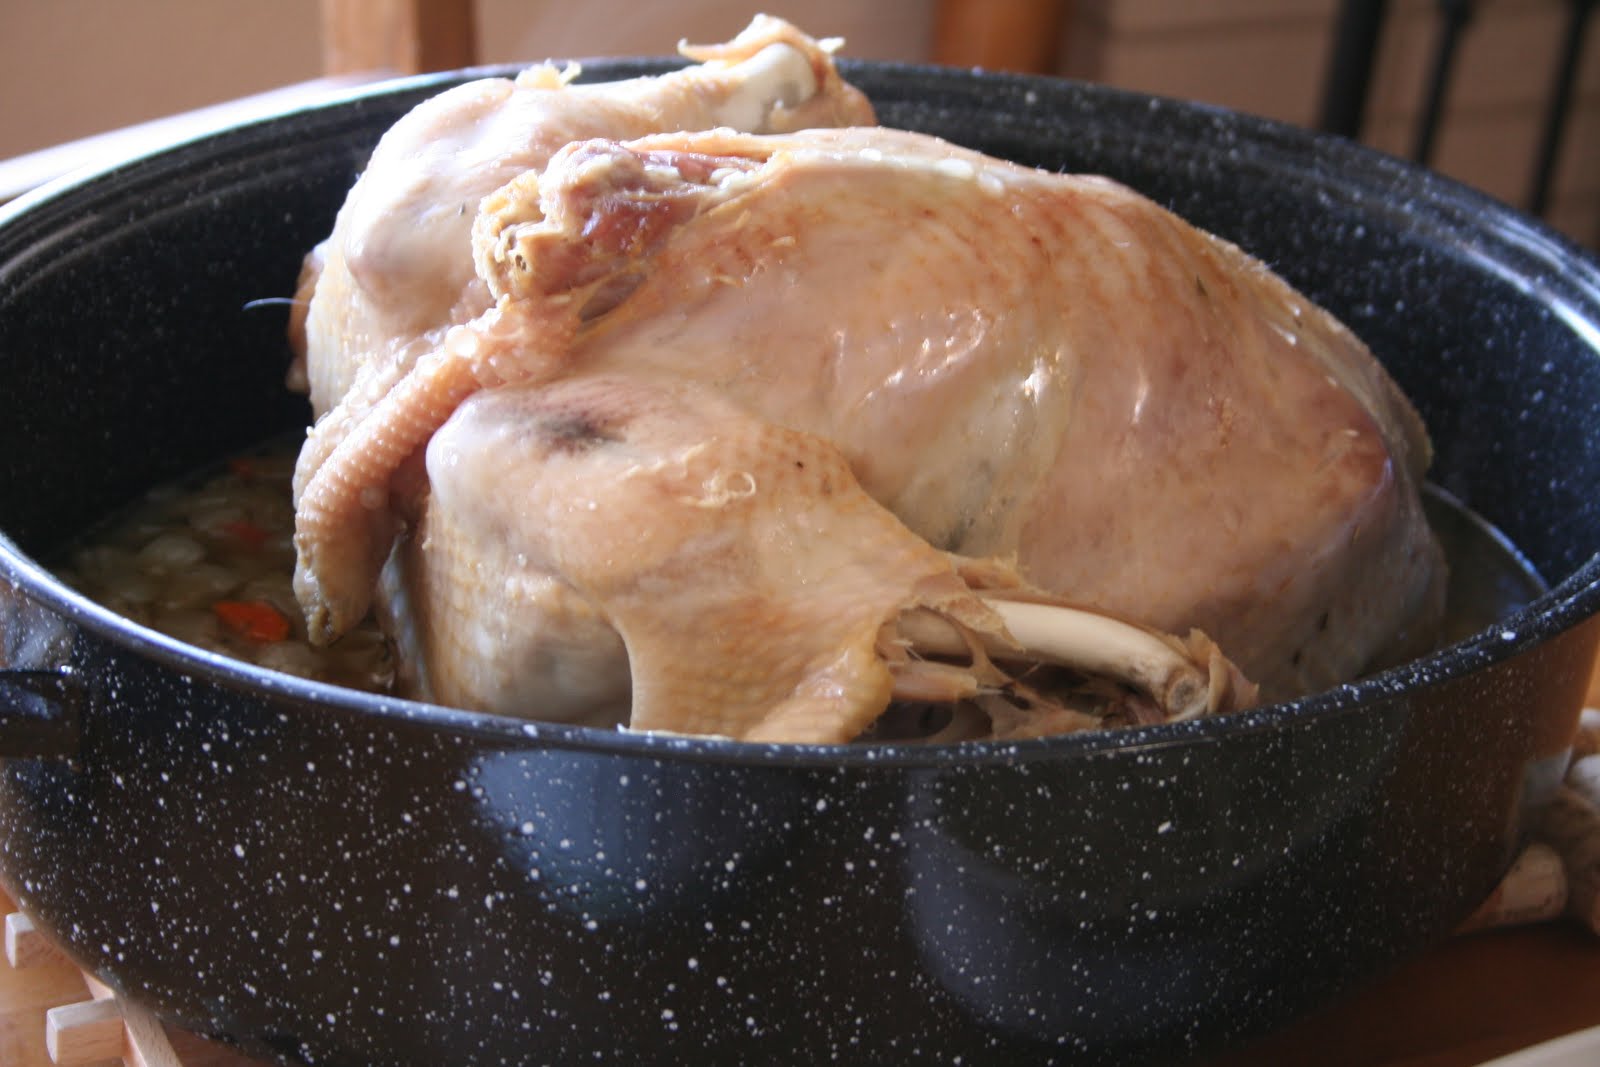
If you'd like the details of how we treated the turkey, pre-cooking, I defrosted it in the refrigerator for a couple of days. Then I brought roughly 2.5 gallons of water to a boil and dropped approximately 3 (is that right?) cups of kosher salt and waited until the salt was entirely dissolved before turning the stove off. Let the salt water cool to room temperature. We double bagged brand new trash bags, placed the entire turkey inside and submerged it in salt water. Then, I had my husband stick the bag in a huge tupperware container and he surrounded the bag with ice cubes and snow (leftover snow from about a week and a half ago). Since we're dealing with poultry, it needs to be kept cool to prevent it from spoiling. We left the turkey in salt water for roughly 24 hours. The next morning, this morning, I had my husband pull the turkey out, get rid of the internal organs, and rinse the turkey under water.

Here are the ingredients for the turkey that I used:
  • a couple of tsp of thyme.
  • a couple of tsp of sage.
  • some pinches of brown sugar.
  • diced celery - I used probably 5-6 stalks.
  • diced carrots - I used 3-4, I think.
  • 1 onion.
  • 10-12 lb turkey.
  • 1 cup of water.

I lined the bed of the roaster with the ingredients, minus the turkey, before putting the turkey on top. Cooked the turkey for about 2.75 hrs, at 325 degrees fahrenheit, with the lid on. Look so juicy.


After we enjoyed the fruit of our labor, he said, "guess we'll always be having turkey brine." The turkey was juicy and tasty, to be sure. And our guest absolutely loved it, too; had to take some home with her. My husband graciously helped by doing most of the lifting and pouring, the grunt work for the turkey preparation, while I just directed traffic and manipulated the other ingredients and spices. So good, it's worth the effort, we all said.

Thursday, November 12, 2009

Chicken and Shrimp Jambalaya

Chicken & Shrimp Jambalaya


A couple of notes to the wise. First, this isn't a super quick recipe. Had to put in that disclaimer, since this blog is, in part, about quick recipes. Certain vegetables: celery, tomatoes, an onion, some green onions, and green peppers need to be washed and cut. Second, the measurements I provide are a rough guess-stination of what I used. This past Sunday, November 8th, was the first time I made jambalaya, ever. Many of you who know me are also aware that I NEVER, EVER cook strictly according to recipe. Things didn't smell quite right until ALL the ingredients had been deposited together. In the end the jamalaya was a huge hit. Made approximately 8-10 servings worth, and it was gone in less than 2 days. There are only two adults (and two babies) in this house. Even my 17 month old baby seemed to enjoy it quite a bit.

Ingredients:
  • 1/2 tbsp dried thyme
  • 1/2 tbsp rubbed sage
  • 1/2 tbsp dry mustard powder
  • 1/2 tbsp ground black pepper
  • 1/2 tbsp ground white pepper
  • 1/2 tbsp cayenne pepper
  • a few pinches of red pepper flakes
  • some sea salt
  • a few cloves of garlic, diced
  • a small to medium sized onion, diced
  • 2 things of green onions
  • 1 tbsp butter
  • 1 large green pepper, diced
  • 1 stalk of celery, diced
  • 5 or 6 small ripe tomatoes (fresh)
  • small can of tomato sauce (14 oz., approximately)
  • 1 cup of rice (measuring the rice before it's cooked), medium grain rice
  • 1-3 cups of chicken broth
  • 2 tbsp worcestershire
  • 1/4 pack of family size chicken breast
  • 16-20 medium sized raw shrimp
  • 4 turkey hot dogs, cut into small chunks
Though this was the first time cooking jambalaya, I didn't bother paying any attention to cooking instructions. Flew by the seat of my pants, using my instincts and basic cooking experience. In case you desire to know what I did, here is the basic idea:

Instructions -

Stir fry the chicken breast separately, in a pan, after letting some garlic and the white part of the green onions simmer in olive oil for a little bit on medium heat. Once the aroma of the garlic and green onions permeate the air, add in the chicken. Cook it until it is barely well done. Set that aside.

I cooked the rice separately. But, I have a rice cooker that does a superb job of cooking rice without needing any attention. And, I have a preference for medium grain rice, over long grain rice. Jambalaya traditionally calls for long grain rice.

In a pot, add all the other ingredients, including spices, the vegetables, the other "meats" (shrimp and turkey hot dogs), tomato sauce, and broth (I also added a little bit of water). Bring the pot of goodies to a boil and then add the chicken and (cooked) rice. Once the raw shrimp is fully cooked, the jambalaya is ready to eat; however, letting it simmer will allow the flavor to soak into everything. Enjoy!

---------

P.S. I do not recommend this recipe to people who are sensitive to spicy food. I'm still recovering from large periods of time I couldn't eat spicy food, while pregnant and nursing. So, my tolerance threshold is a bit low for spicy stuff. Loved this soup, but it opened up all the pores in my face.

P.P.S. Tonight I purchased enough ingredients to double the recipe, hoping it will last double the time? My husband loved it so much he had it every meal (including breakfast) and every snack time. I didn't get much of a chance to eat it after that first meal, because he was devouring it so quickly. We'll see what happens this time.

Monday, February 2, 2009

Swordfish basking over corn chowder

Last night, Troy and I splurged a little. What is normally $14.99/pound was $7.99/pound for fresh swordfish. What else is a steal? Corn chowder mix, bulk. Added red potatoes, green onions, extra corn, water, and milk to the mix.

I don't have more detailed ingredients to share other than what I have already disclosed, but I am more happy to divulge instructions.

I washed and cut the red potatoes (leaving the peel on it; it's nutritious and difficult to discern once it's been cooking awhile). Cutting them into small pieces leaves the boiling time a bit shorter. Bring them to boil in water and leave boiling until tender. Depending on how much water you started with, you may want to empty some of the excess (not all) water. I didn't completely empty the water used to boil the potatoes, to thicken the soup. Dump in the corn chowder mixture, adding milk and possibly water as needed. Also add in green onions, additional corn, and salt to taste. Once everything is brought to boil and simmers for a few minutes, the soup is ready to serve.

As for the swordfish, I pan fried it. In a non-stick pan, I put in diced garlic with olive oil on medium heat. Once I could smell the garlic simmering, I put the swordfish on the pan. My piece of swordfish was particularly thick; so, I ended up cooking it for 3-4 minutes on each side. Somewhere in the cooking process, I drizzled each side with salt and soy sauce. Fish can easily be overcooked. Thus, constantly check it.

Monday, January 19, 2009

Salmon burgers with baked soy bean cakes

I'm trying really hard to cook tasty and nutritious meals that won't break the piggy bank. Many of you know that I love, love, love rice. Here's yet another dish I'm serving over a bed of rice. I bought salmon burgers (came in a pack of ten) at Sam's Club and bought the baked soy bean cakes (that's what they're called; I didn't bake them myself) at Pacific Ocean International Supermarket. Garlic and green onions with olive oil on medium heat. Once sizzling (not burning) and the smell permeates, I tossed in the tofu. Added salt and soy sauce. The tofu really doesn't need to be cooked, but I let it cook awhile, to soak in the soy sauce and salt. After that, I placed the sliced salmon burger in (no more seasoning necessary) and when the salmon is cooked, the dish is ready to serve. Again, I cooked the rice in the rice cooker and served the dish over a bed of rice.

2009-1-19

It smelled and tasted much better than it looks here in the picture. It also looked better in person than in the picture. I will be making this again soon! Yummy.

Seared tuna with peas

There is a grocer called Sunflower Farmer's Market that has fantastic weekly deals, and I buy according to what they have on sale. One week the store had a good price on fresh tuna. Mmmm. As Americans, we tend to overcook our meats and fish, and, as my dad pointed out, cooking fish in the oven increases the chances of overcooking the fish.

Since my pregnancy with Victoria, I have really enjoyed seared tuna. For those of you who are not familiar with the term "seared," it means cooked on the outside and fleshy or pink on the inside.

I put some green onions and olive oil in a pan on medium heat. Once the onions were sizzling and I could smell the fragrance of it, I put the fish in the pan. Probably cooked the fish approximately four to five minutes on each side. Keep in mind this was fresh fish. If you're using frozen fish, the cooking time will need to be increased. I used some salt and soy sauce to flavor the fish, while cooking in the pan. Once the fish was almost done, I tossed in frozen peas (frozen vegetables keep the nutrients in them). Viola, the meal's ready to go. The fish and peas, I served over a bed of rice. I cooked the rice in a rice cooker.

2009-1-8

Sunday, December 21, 2008

Delicate slices of udon soup

One of my British friends once told me that he thought it rather drab and boring that a dish be named by some of its contents. I tried to explain that Americans are not interested in trying anything mysterious or choices that do not include a description in the titles. Didn't convince him. I guess Europeans go for menu choices that have creative titles.

My best shot at compromising between the two is: delicate slices of udon soup. There are slices of "fish cake," in the soup. Made this sort of soup for the first time last night, and yes, it is entirely my creation.

I've been craving udon for some time now. And, as many of you know, I am an avid soup maker and consumer. What better meal to be enjoying in cold weather?

I have one other apology to make. This recipe is extremely imprecise. For the most part, I am just going to list the ingredients, in case you are interested in trying this. I figured that would be better than nothing. Otherwise you can come over and try it!

Ingredients:
water
tofu (I used 2 packages of firm tofu)
shittaki mushrooms (a handful)
bamboo shoots (I used one large can - around 15 oz.?)
1 package of fish cake (the pink and white thing you see in the picture)
2 bundles of udon noodles
green onions
soy sauce
salt


The udon and the soup were cooked separately. For the udon, once a pot of water is brought to boil, cook the udon for 12 minutes. After the mushrooms have been soaking in water for a few hours (I buy them dried), marinate them in a bowl of soy sauce and set them aside. Bring all the other contents of the soup to a boil adding salt to taste. Once the soup is boiling, drop the udon noodles in and bring the contents back to boiling. A few minutes before turning the stove off, drop the mushrooms into the soup and stir. Viola! Ready to serve.

Here's a bowl of delicate slices of udon soup, ready to eat:


2008-12-20